


By default, stock alteration has two different options:
- Alter present stock
- Alter or transfer stock
The feature 'Advanced stock alteration’ bundles these two options in one screen. You can also directly view and change the allocation in the alteration screen. This way, the stock batches can be updated faster and more easily.
 Parameter
Plant sizes
Stock alterations
 |
The description below assumes that WinTree is used with the basic module, with Location Management (66) and Batch Administration (61) included. If only the basic module is used, no locations can be updated, nor can batches be split into multiple batches. The other features are identical. |
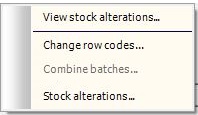
The alteration screen is opened by clicking on [Options] in the 'Maintain own production' or ‘Maintain stock (per location or per plant)' menu. Select the option ‘Stock alterations…’ in the pop-up menu.
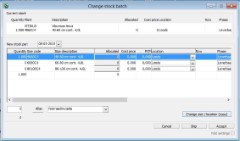
The screen opens up, as below.
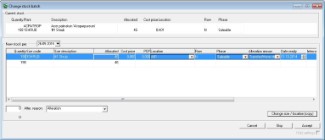


The screen is divided in two parts. The upper part of the screen displays the data of the selected stock batch. No data is updated here, this takes place in the bottom part of the screen.
By default, the Windows system date is used for the update date. This date can be changed. The number, the size, the cost price, and the row can be updated by clicking in the blue coloured line and entering the required data. The data in the columns: Location, Phase, and Alteration reason is updated using the drop down list, opened with the little black arrow on the right side of the field. The Location column is only available when using the Location management module (module 66). The data in the drop down list originate from the master data. The quantity can be adjusted directly in the line. In doing so, the quantity to be updated is placed in the field at the bottom left on the screen, in front of the text Alteration reason.
It is also possible to update the quantities directly in this field. To lower the quantity, the minus sign needs to be used. So lowering 1000 to 500 means entering -500. If needed, you can enter an alteration reason behind this field.
Click on [Copy] to split up a stock batch.
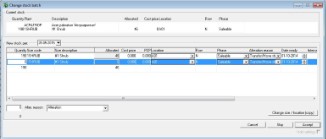
A copy is made of the first line in which the quantity is set to zero. The quantity of the split batch can now be entered. After entering this quantity, the quantity in the first line is automatically lowered. Also the size and the remaining data of the split batch can be updated. It is possible to split one batch into multiple separate batches. Click on [Copy] to create the required batches.
Click on [Accept] to process the updates.
Change allocation
Open the update screen to change the allocation. If a batch is allocated, you will find a quantity in the 'Allocated' column. Click on this allocated quantity, this field is a button.
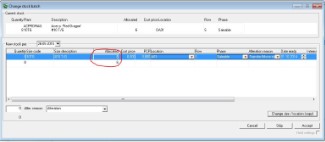
Click this button and an ‘Allocate batch’ screen is opened.
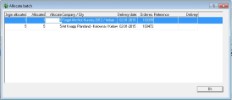
In the opened screen, the allocations on the stock batch are displayed. In the 'Allocate' column, the allocated quantity can be updated. Press <<Tab>> after updating the allocated quantity and close the screen with the cross. The allocation is now changed.

The warning message above is displayed hereafter in the update screen.
If the original batch is split up, the quantity of split up batches can be changed. By clicking the 'Allocated' field of this split batches, the allocation screen is displayed again. In the opened screen, the allocations of the sales lines, which were allocated to the original batch, are displayed. In the 'Allocation' column, a quantity can now be entered. This way the sales line is allocated to the split up batch. It is not possible to allocate sales lines, which weren't allocated to the original batch, in this screen. If an allocation has to be made on other sales lines, this will need to be settled in the usual way, via the sales order.
Multi selection batches
Multiple batchs can simply be updated in succession. Using the <<Shift>> and/or <<Ctrl>> keys, multiple stock batches can be selected. Click [Options] after selecting the lines, and choose 'Stock updates…' In the newly opened screen, the data from the first selected stock batch are displayed. In the blue title bar of the screen, after 'updating stock', it states in brackets 1 from X, where X is the total amount of selected lines.
When updating multiple batches, you can set which data from the first updated batch should to be used for the following batches.
Example: Set the Location column that should be copied to the next batch. The location of the first batch is put on 'bed 1'. After clicking on [Accept], every batch (selected through the multi selection) is then set to this location as well. If the location is changed to 'bed 3' for the third batch, consequently every subsequent batch will get this location.
Locking the columns to be copied is done via the property screen of the 'Change stock batches' screen. Open this screen and click the right mouse button. Select the option 'Properties'.
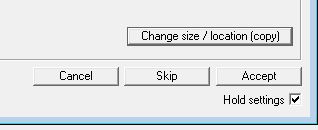
Check the columns which need to be retained. In order to adopt the date of the previous batch in an update, check the checkbox ‘Hold settings'. The value of this checkbox is set in parameter 2078. Click on [OK] to save the settings.
Following this, the first selected batch can be updated. After updating the first stock batch, click on [Accept]. Below this button you find the checkbox ‘Hold settings'. By doing this again for the next batch, the data from the fixed columns will be adopted.
The alteration screen stays opened and the next stock batch is displayed. This batch can also be updated. After having clicked on [Accept], the update screen is opened, until all selected stock batches are updated. If, for the displayed batch, no updates need to be processed, use [Skip] to go to the next batch. After updating the last batch, the update screen closes itself, and the message that all selected batches have been processed appears.
Click on [Cancel] to close the entire update screen. The last entered updates will not be processed.
 |
If multiple alterations need to be executed frequently, the use of a scanner or tablet is a good alternative. Ask TSD for the possibilities. |
Alterations using growth sizes
If a stock batch is updated, in which growth sizes are used (entered at the used plant size, or at the stock item), the growth sizes will be displayed in the update screen immediately below the stock line, without quantities.
For each growth size, the correct stock number can now be entered. As soon as a number is entered for one of the growth sizes, the number of the original batch is lowered. It is also possible to add an extra line using [Copy] and to select a completely different size.
Also see the description Growth sizes.
Multiplication sizes
If a stock batch is updated when the plant size it is a multiplication size, it is possible to split up the original stock batch. Using [Copy], an extra line is created. After entering the quantity for this new batch, the quantity of the original batch is NOT changed. If needed, this quantity can be changed manually.
When using growth sizes combined with multiplication sizes, batches can be split up quickly. The quantity of stock in the split up batches may be higher than that of the original batch.